Cava
Rmpc supports music visualisation via Cava.
Preview
Section titled “Preview”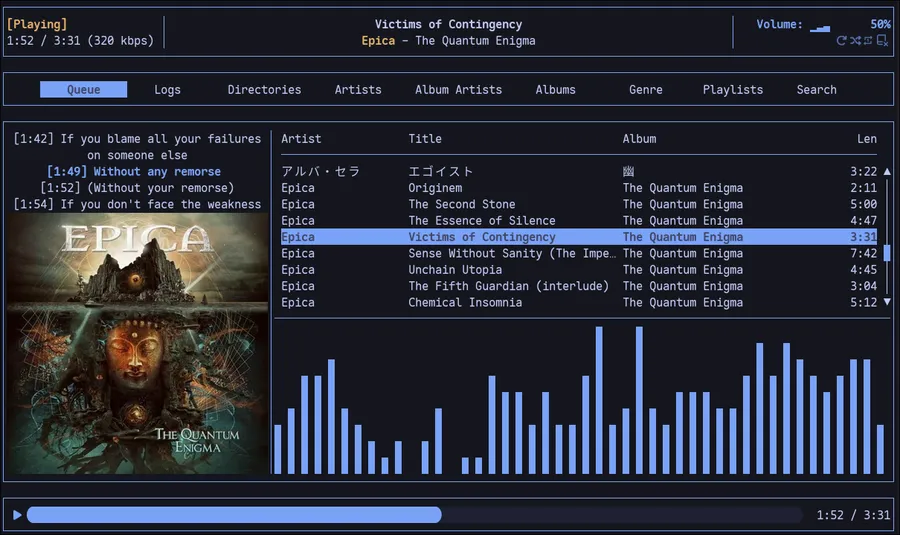
First ensure that Cava is installed on your system and available on your $PATH.
After that you need to setup Cava, MPD and rmpc to talk to each other.
-
Configure MPD to output data to a FIFO. This goes in your
mpd.confaudio_output {type "fifo"name "my_fifo"path "/tmp/mpd.fifo"format "44100:16:2"} -
Configure rmpc and by extension Cava. This goes in your
config.ron. The most important bit here is the input, this has to reflect yourmpd.conffrom step one. These settings are passed directly to cava so please refer to its documentation for more info. Most of these options do not have to be provided and have sensible defaults.cava: (framerate: 60, // default 60autosens: true, // default truesensitivity: 100, // default 100lower_cutoff_freq: 50, // not passed to cava if not providedhigher_cutoff_freq: 10000, // not passed to cava if not providedinput: (method: Fifo,source: "/tmp/mpd.fifo",sample_rate: 44100,channels: 2,sample_bits: 16,),smoothing: (noise_reduction: 77, // default 77monstercat: false, // default falsewaves: false, // default false),// this is a list of floating point numbers thats directly passed to cava// they are passed in order that they are definedeq: []), -
Configure the pane layout to include Cava. This goes in your
config.ronunder the tabs section. Below is an example of how to add a Cava pane split alongside the queue and album art:tabs: [(name: "Queue",pane: Split(direction: Horizontal,panes: [(size: "40%", pane: Pane(AlbumArt)),(size: "60%", pane: Split(direction: Vertical,panes: [(size: "50%", pane: Pane(Queue)),(size: "50%", pane: Pane(Cava)),],)),],),),],See Panes documentation for more information about configuring panes.
Theming
Section titled “Theming”The look of visualiser can be configured in your theme
(not in config.ron). Below are possible options.
cava: ( // symbols that will be used to draw the bar in the visualiser, in ascending order of // fill fraction bar_symbols: ['▁', '▂', '▃', '▄', '▅', '▆', '▇', '█'], // similar to bar_symbols but these are used for the top-down rendering, meaning for orientation // "Horizontal" and "Top" inverted_bar_symbols: ['▔', '🮂', '🮃', '▀', '🮄', '🮅', '🮆', '█'],
bg_color: "black", // background color, defaults to rmpc's bg color if not provided bar_width: 1, // width of a single bar in columns bar_spacing: 1, // free space between bars in columns
// Possible values are "Top", "Bottom" and "Horizontal". Top makes the bars go from top to // bottom, "Bottom" is from bottom up, and "Horizontal" is split in the middle with bars going // both down and up from there. // Using non-default symbols with "Top" and "Horizontal" may produce undesired output. orientation: Bottom,
// Colors can be configured in three different ways: a single color, different colors // per row and a gradient. You can use the same colors as everywhere else. Only specify // one of these:
// Every bar symbol will be red bar_color: Single("red"),
// The first two rows(two lowest amplitudes) will be red, after that two green rows // and the rest will be blue. You can have as many as you want here. The last value // will be used if the height exceeds the length of this array. bar_color: Rows([ "red", "red", "green", "green", "blue", ])
// A simple color gradient. This is a map where keys are percent values of the height // where the color starts. After that it is linearly interpolated towards the next value. // In this example, the color will start at green for the lowest amplitudes, go towards // blue at half amplitudes and finishing as red for the highest values. Keys must be between // 0 and 100 and if the first or last key are not 0 and 100 respectively, the lowest and highest // value will be used as 0 and 100. Only hex and RGB colors are supported here and your terminal // must support them as well! bar_color: Gradient({ 0: "rgb( 0, 255, 0)", 50: "rgb( 0, 0, 255)", 100: "rgb(255, 0, 0)", })),